

Office of the Registrar
Students will receive an email the Thursday before registration week with instructions on how to view when they will be able to register for the upcoming term. Please visit our registration FAQ page for answers to specific registration questions.
Please Note: You are not permitted to miss class in order to register, nor are you permitted to register during class times unless it is permitted by the instructor.
Prepare for Registration
When the Schedule Goes Live
STUDENTS SHOULD:
Check whether their account has any holds.
“View Holds” will list any holds on your account. You will see a message stating that there are no holds on your record if none exist. Holds should be resolved with the appropriate office before registration opens or you will not be able to register.
- Go to treehouse.drew.edu and click on the “Students” tab.
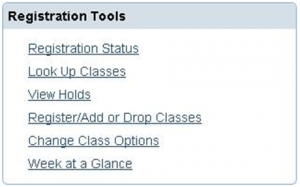
- Under the heading “Registration Tools”, click on the “View Holds” link.

- Choose a term, if asked.
- Your holds information will be displayed.

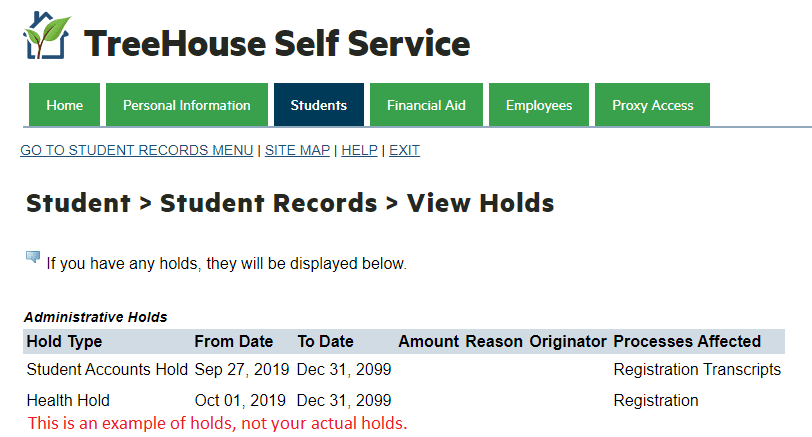
Active holds are also displayed at the top of your Ladder page under the Student Alerts heading on the right-hand side.
Run their Ladder and review missing requirements.
Students should ensure they are on track to graduate by reviewing all graded coursework and transfer credits in Ladder and that it is being applied appropriately to their requirements. If a student has any questions or finds any discrepancies, they should make an appointment with their advisor and review the Ladder together.
Check-in with their Advisor.
- Review ladder and discuss possible schedule options.
- Receive PIN which is required for registration (Fall and Spring terms only).
Plan their schedule prior to registration.
The schedule of classes goes live roughly two weeks before registration. Students should review class offerings to have a preferred schedule and a back up schedule with CRNs available in advance of registration.
- Go to treehouse.drew.edu and click on the “Students” tab.
- Under the heading “Registration Tools”, click on the “Look Up Classes” link.
- Choose a term, if asked.
- Click “Advanced Search” at the bottom of the page to search by Subject, Schedule Type, Attribute, Instructor, or Days/Times. Click here to view detailed instructions on how to search for classes.
UG Specific: Declare a major if they have 56 or more credits earned.
Undergraduate students with 56 or more earned credits must declare a major or risk a registration-blocking hold added to their account.
- Go to treehouse.drew.edu and click on the “Students” tab.
- Under the heading “Registrar”, click on the “Declare or Change Major/Minor” link.
Major declarations require approval from the department/program before the change is entered into the student system. Instructions are available here.
Thursday Before Registration
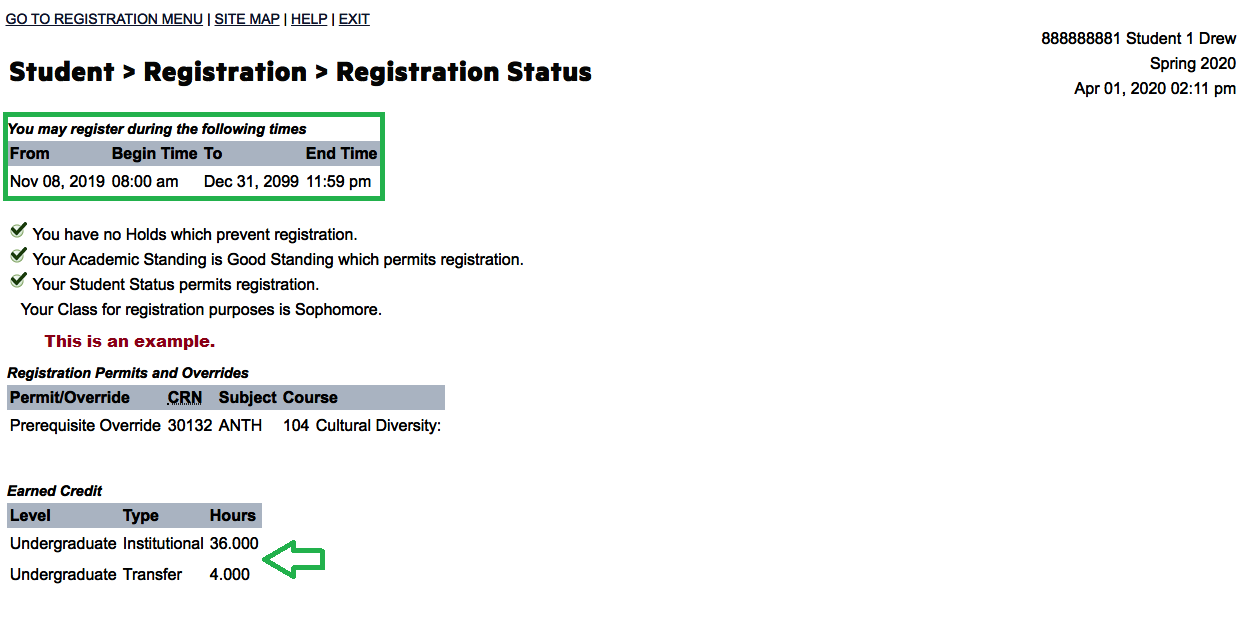
CHECK YOUR REGISTRATION STATUS
Your registration status will tell you whether you have any holds on your account, your academic standing, your student status and your the time and day you can register. It will also give you a summary of your academic career so far including the number of credits you have earned, your program, and your majors and/or minors.
- Go to treehouse.drew.edu and click on the “Students” tab.
- Under the heading “Registration Tools”, click on the “Registration Status” link.
- Choose a term, if asked.
- Your registration status will be displayed. Additionally, you can view any overrides that have been entered on your behalf for the term.
- All registration times are in Eastern Time (ET) (Eastern Standard (EST) or Eastern Daylight (EDT) depending on time of year.)
 Registration Time Tickets
Registration time tickets are based on overall earned hours (institutionally earned credit + transfer credit). Students are able to view their earned credit by following the instructions above to view their registration status for the term the Thursday before registration week. Additionally, students can view their earned credit on the web version of their academic transcript; click here for instructions on how to view. Ladder shows both earned and in progress hours and should NOT be referenced when determining earned hours. Students who have applied to graduate for the end of the current term will not receive a time ticket for the upcoming term.
| Monday | Wednesday | Friday | Following Wednesday | |
| 8:00 AM | Graduate and UG 92+ earned credits |
UG 56-91 earned credits | UG 27-55 earned credits | UG 0-26 earned credits |
Search for Classes
How to Access the Schedule
Active Students: in TreeHouse, under the “Student” tab, click “Look Up Classes” from the “Registration Tools” box.
Faculty: in TreeHouse, under the Faculty tab, click “Look Up Classes” from the “Faculty Tools” box.
- By looking up classes from the TreeHouse Dynamic Schedule, faculty are viewing the same class list as the students. The Dynamic Schedule is also a more accurate and up-to-date class list than Banner Reports.
ANYONE: Click Dynamic Schedule. NOTE: If this link does not work, copy and paste the following URL into a new browser window: https://selfservice.drew.edu/prod/bwckschd.p_disp_dyn_sched.
How to Search for Classes
1. Select the term to search from the drop-down and click “Submit.”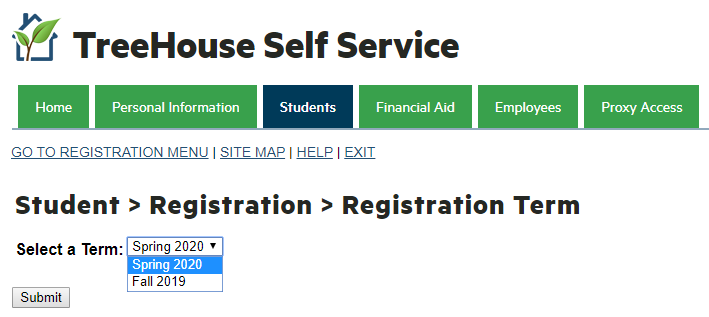 2. Simple Search (Student View Only): If you want to search for all sections under a specific subject, select the subject from the list and click “Course Search.” You may select more than one subject by holding down the CRTL key while selecting subjects. If you want to search for sections within certain requirements (e.g. course number, attribute, instructor, etc.) click “Advanced Search.”
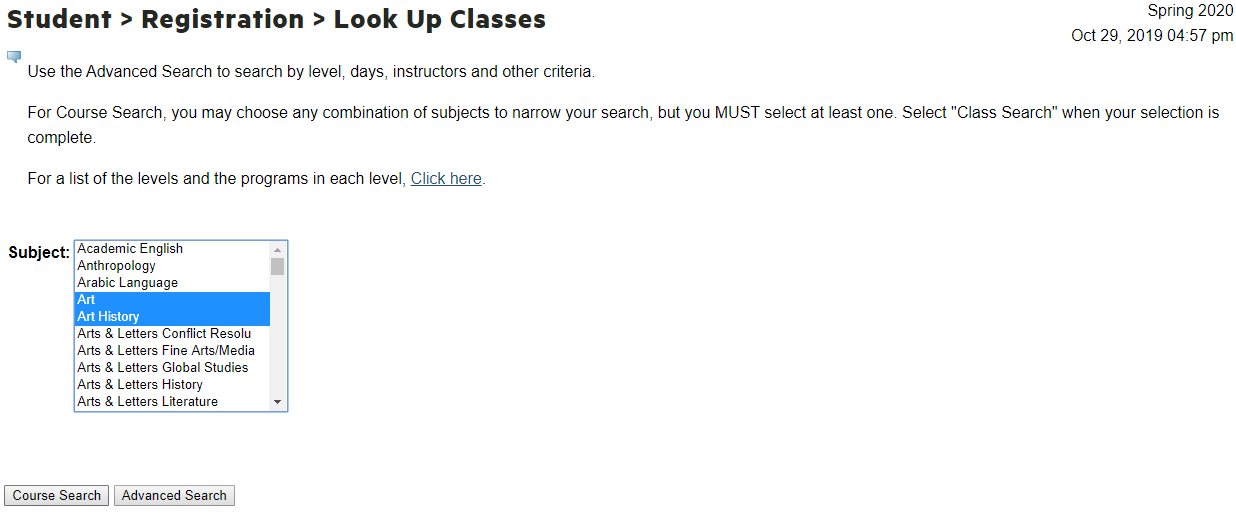
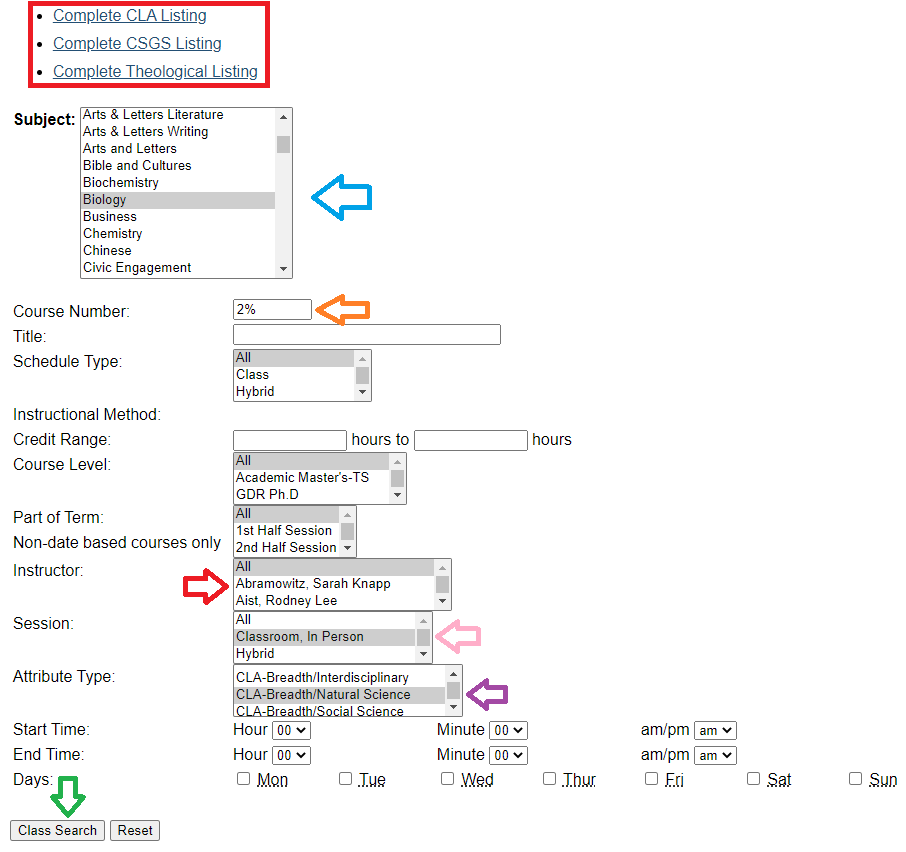
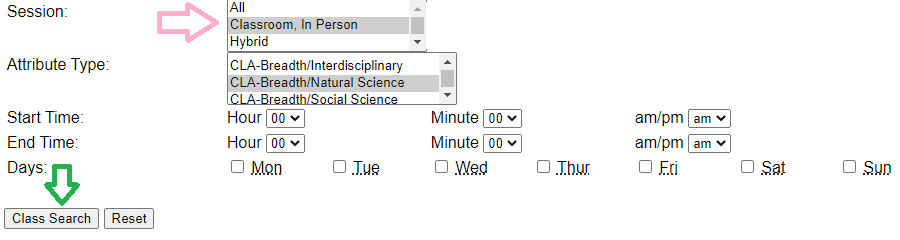
3. Advanced Search: (colors are in reference to the image below)
- Blue: select one or more subjects (by holding down CTRL while selecting) to search. If you want to search all subject codes, click in the “Subject” box and press CTRL+A from your keyboard. This will highlight all subject codes.
- Orange: type an exact course number, or use a % sign to search for partial numbers. (i.e. 2% returns all 200 level classes being offered under the selected subject code).
- Purple: select one or more attribute to return all classes with those attributes under the selected subject codes.
- Pink: Session allows you to search by meeting type (whether the class will be taught online, in person, etc.)
- Red: if searching for classes taught by a specific instructor, do not choose a subject. Select the instructor from the “Instructor” box and click the link for your college from the top of the page. This will return all classes taught by the specified instructor in that college, regardless of subject code.
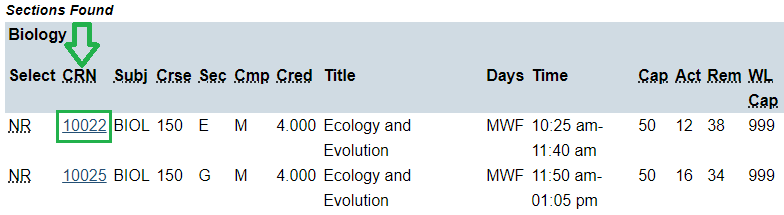
4. Review the search results.
NR (not available for registration) will display under the “Select” column when registration is not open for a term.
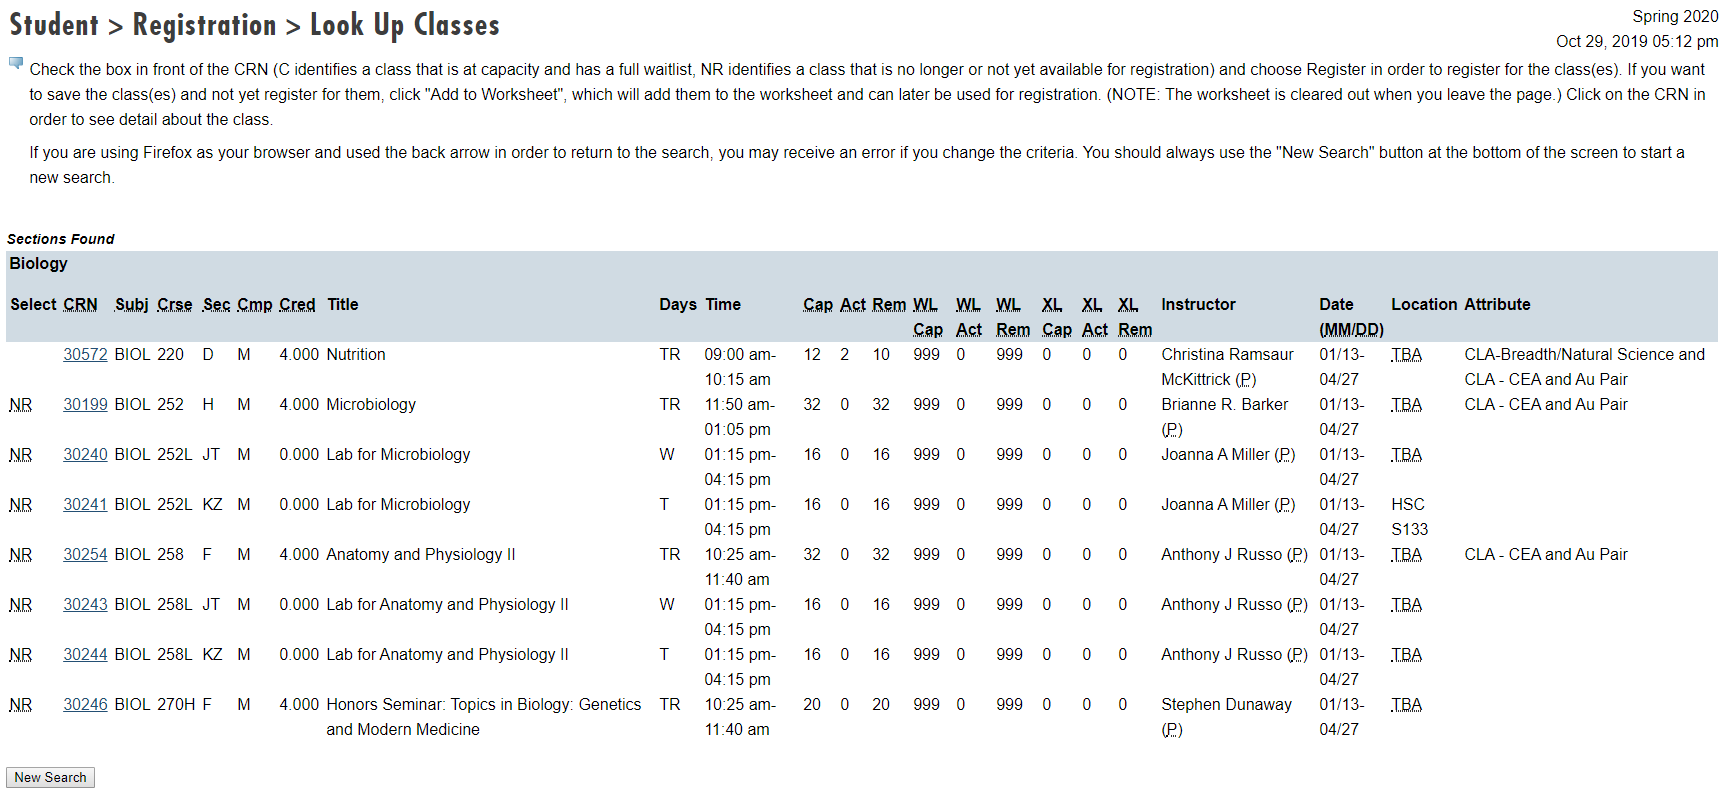
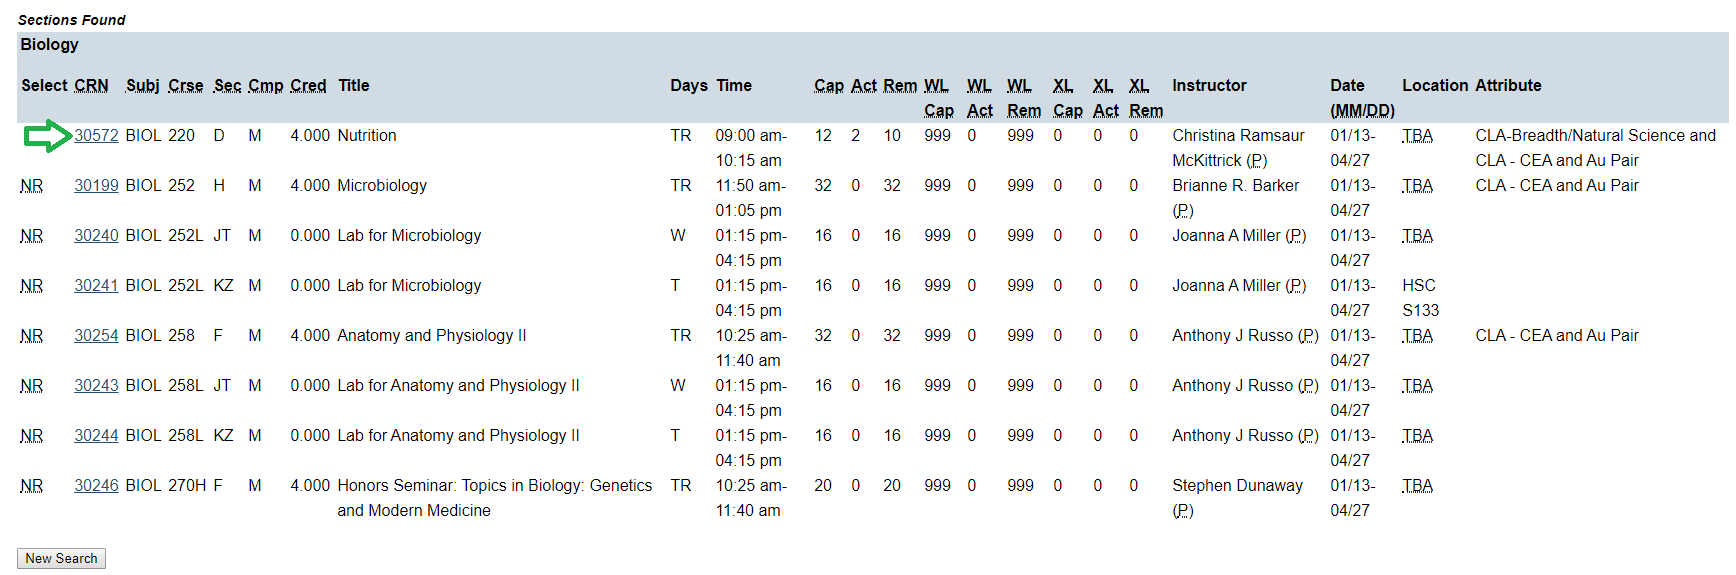
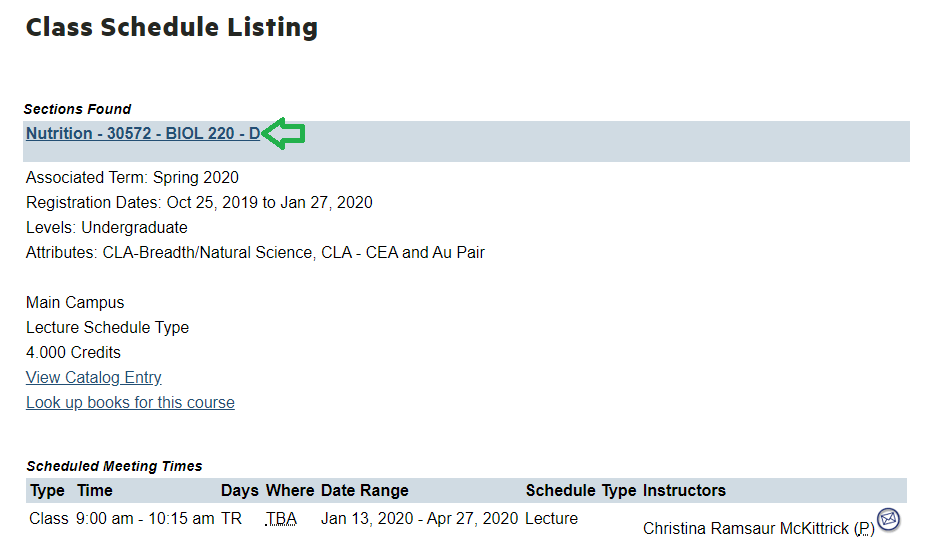
5. Click on the CRN hyperlink under the “CRN” column to review more information about the class.
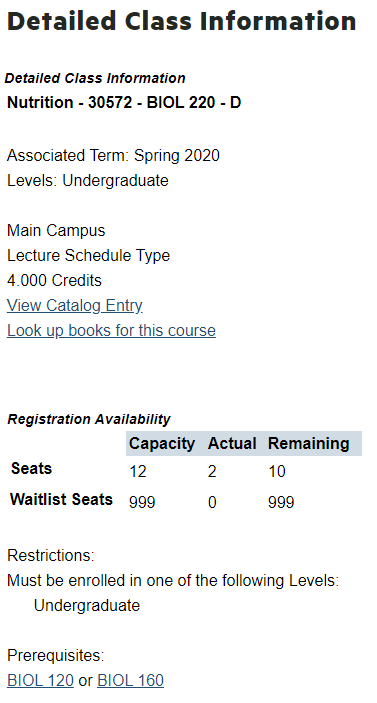
6. Click on the title of the class to view detailed information about the class including: seats available, restrictions, prerequisites, books assigned to the course, and cross-list information.
Registration
Click here for an instructional video on how to register for classes.
Register for Classes
Please review the “When the Schedule Goes Live” section of the website for steps that should be taken before registration opens for a term.
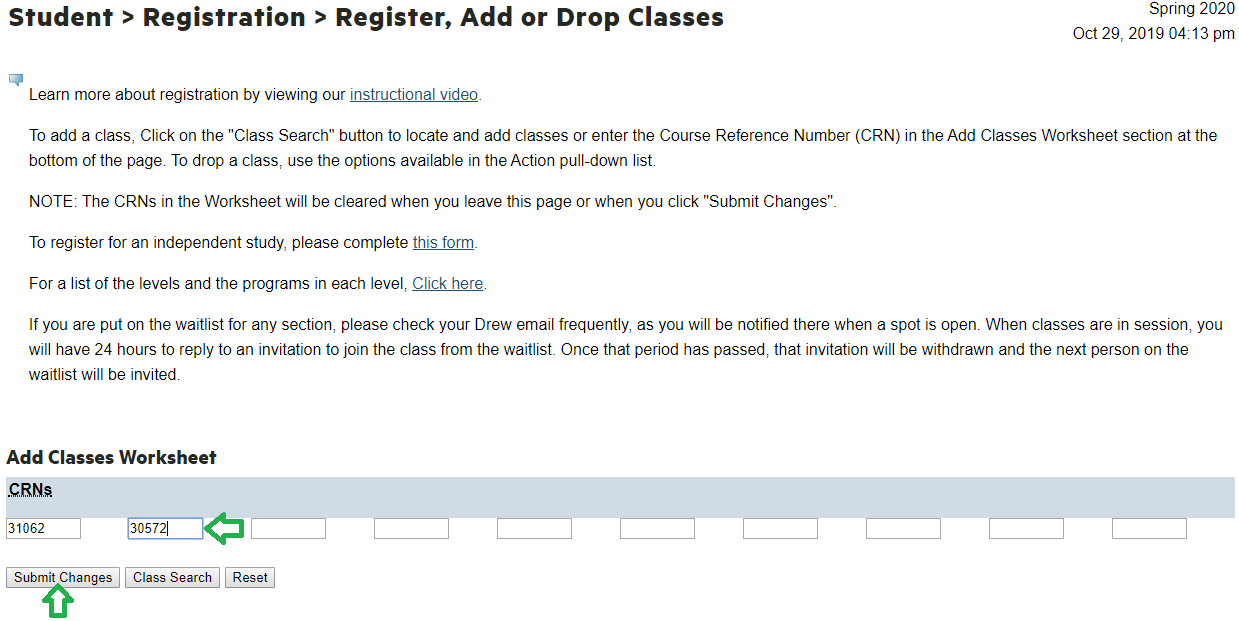
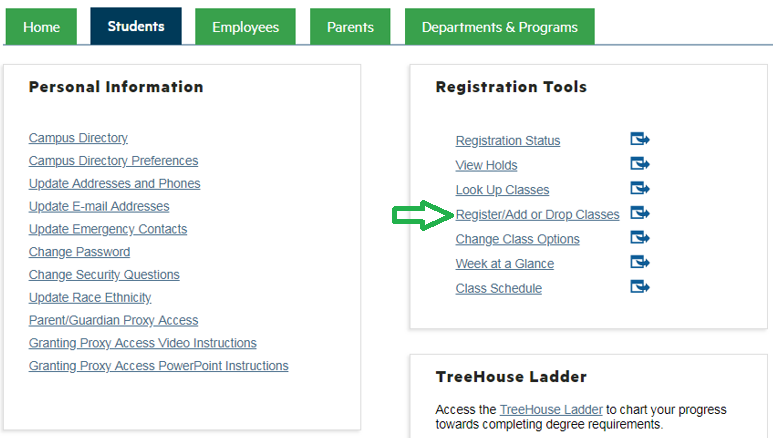
You can register by entering the 5-digit CRNs directly into the “Add Classes Worksheet” on the “Register/Add or Drop Classes” page or by searching the schedule and checking the box under “Select” to add classes to your worksheet.
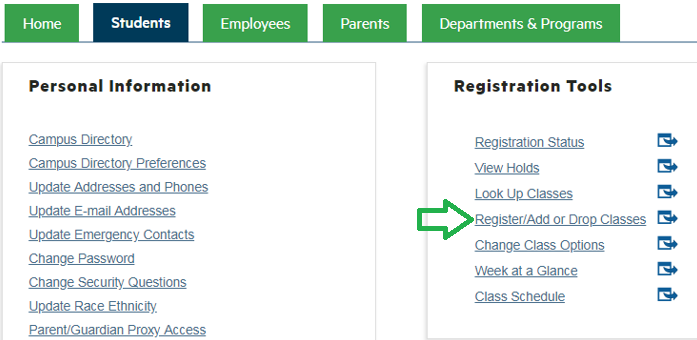
1. Click “Register/Add or Drop Classes” from the “Registration Tools” box under the “Student” tab in TreeHouse.
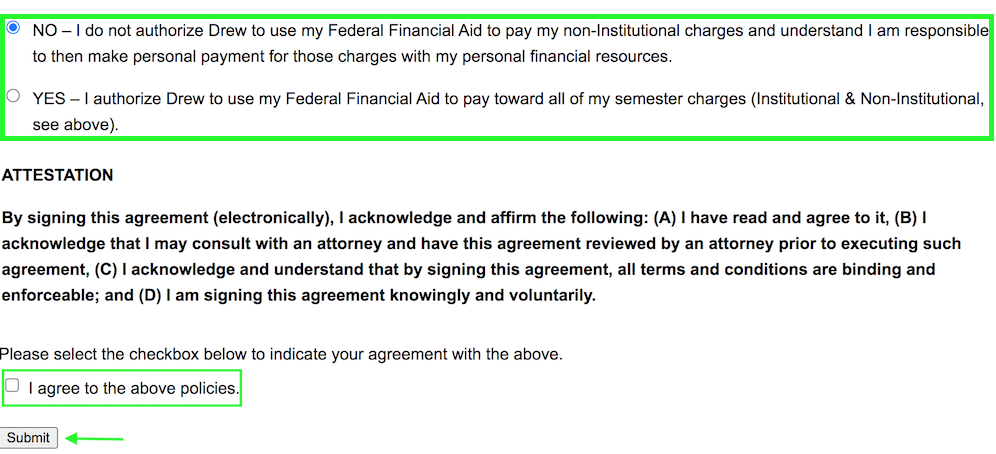
- If it is your first time in the registration screen, you may need to complete the Registration Agreement. Read through the page and scroll to the bottom. Select “Yes” or “No,” check the box to agree to the policies, and click “Submit.”
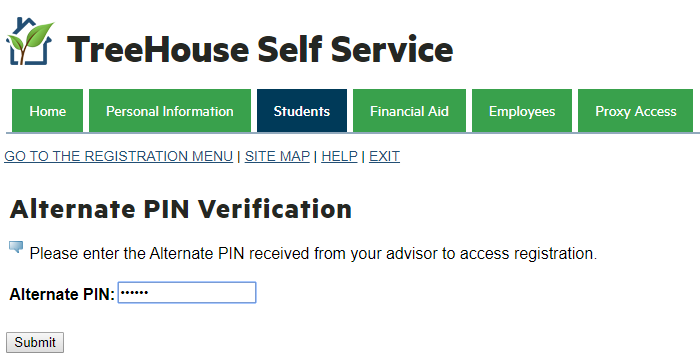
2. Select the term to register from the drop-down and click “Submit.”
3. Enter the 6-digit pin you received from your advisor and click “Submit.”
4. Register for Classes
If you have planned ahead and have the 5-digit CRNs for the classes you want to register:
- Enter the CRN(s) into the “CRNs” box(e)s and click “Submit Changes.”
If you need to find the CRN(s):
- Click “Class Search.”
- Review the “How to Search for Classes” section of the website for detailed search instructions.

Once you have found a class section to register, check the box under “Select”.
- Click “Register” if you want to add the class directly to your schedule.
- Click “Add to Worksheet” if you want to enter more CRNs and register all at once.
- Once all the CRNs are entered, click “Submit Changes.”

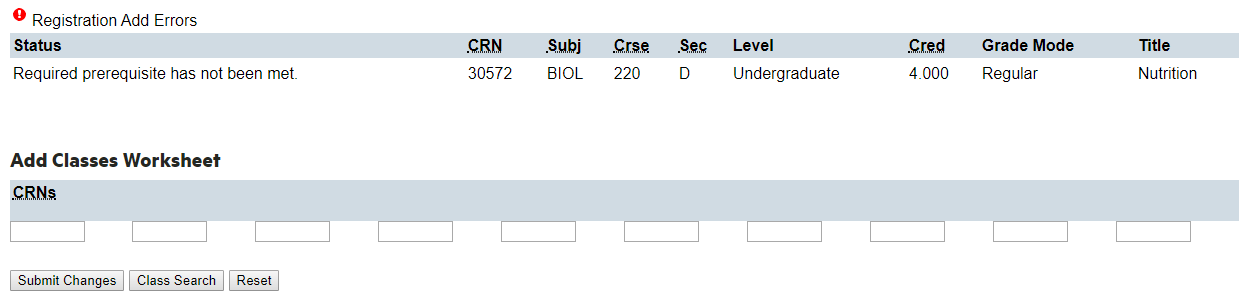
5. If there is a class with registration restrictions, the system will display a Registration Add Error under the “Status” column.
- Refer here, to view all of the registration add errors and what steps to take to resolve.
- If a class has more than one registration add error, it will only display one at a time. The subsequent errors will not display until the first error is resolved.
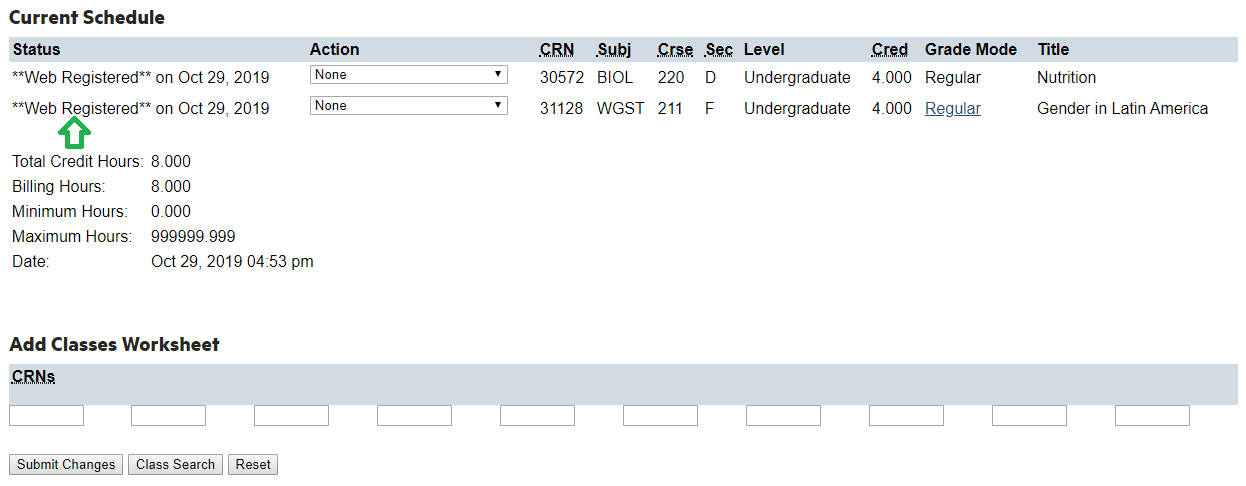
6. Confirm the classes added to your schedule before leaving the registration screen.
A video on the registration process is available online: watch this video.
Alternate Access to Registration
If registration is not accessible from TreeHouse, students can access the link via the below instructions.
1. Type selfservice.drew.edu into a browser search bar (preferably Chrome).
![]()
2. Click the Student tab.
3. Click the Registration link. 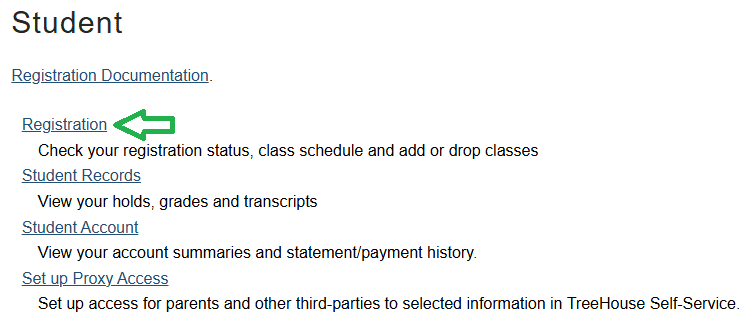
4. Select Register, Add or Drop Classes to access the registration screen.
Holds and Whom to Contact
Students can view their holds by logging into TreeHouse and clicking “View Holds” from the “Registration Tools” box under the “Student” tab. 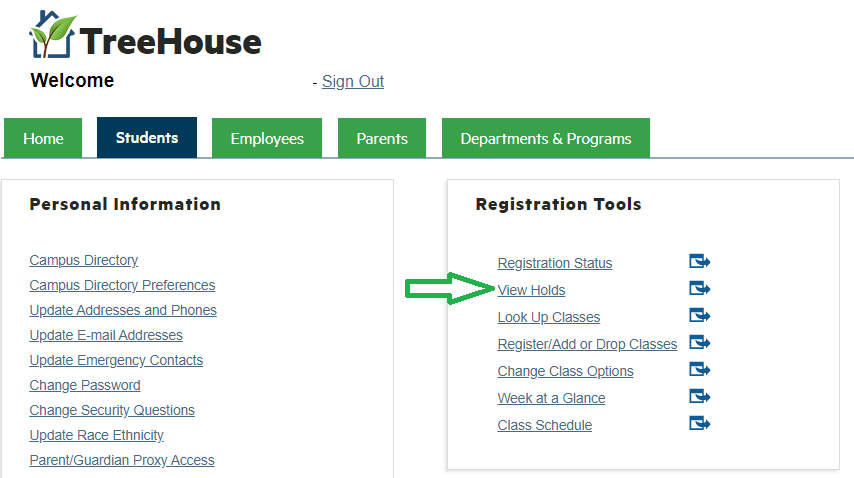
| Hold Type | Whom to Contact to Resolve the Hold |
| Academic Services Hold | Advisor/Program Director |
| Academic Standing: Probation | Center for Academic Excellence – Brother’s College RM 114 – 973-408-3327 |
| Dean of Students | Office of Campus Life and Student Affairs – Ehinger Center RM 147 – 973.408.3390 |
| EOS/EOF Registration Hold | Educational Opportunity Scholars – Embury Hall, 1st Floor – 973-408-3578 |
| Financial Aid | Office of Financial Assistance – Brother’s College Lower Level RM 11 – 973.408.3112 |
| Health Hold | Health Services – Morris Health Center (behind Simon Forum) – 973.408.3414 Refer to any emails sent to you from Health Services for what you are missing and instructions on how to submit. |
| INTO Document Hold | International Student & Scholar Services – Tilghman House – 973.408.3182 |
| INTO Financial Hold | International Student & Scholar Services – Tilghman House – 973.408.3182 |
| Major Declaration | Declare a major via TreeHouse: Click the Declare of Change Major/Minor link from the Registrar box under the Student tab of TreeHouse. |
| Perkins Loan | Office of Financial Assistance – Brother’s College Lower Level RM 11 – 973.408.3112 |
| Re-Entry | Complete the appropriate re-entry form online for your college: Caspersen, Theo, Undergraduate |
| Re-entry Required: Not Reg’d | Complete the appropriate re-entry form online for your college: Caspersen, Theo, Undergraduate Center for Academic Excellence – 973.408.3327 |
| Registrar | Registrar’s Office – Brother’s College Lower Level RM 6 – 973.408.3025 |
| Registrar Transcript Hold | Registrar’s Office – Brother’s College Lower Level RM 6 – 973.408.3025 |
| Registration Hold (Stdt Accts) | Student Accounts – Brother’s College Lower Level RM 8 – 973.408.3114 |
| Student Accounts | Student Accounts – Brother’s College Lower Level RM 8 – 973.408.3114 |
| Student Conduct | Office of Campus Life and Student Affairs – Ehinger Center RM 147 – 973.408.3453 |
| Title IX Online Training | Title IX Office – EC 147 – 973.408.3635 |
| Title IX Re-entry | Title IX Office – EC 147 – 973.408.3635 |
| Trans/Diploma Review Stdt Acct | Student Accounts – Brother’s College Lower Level RM 8 – 973.408.3114 |
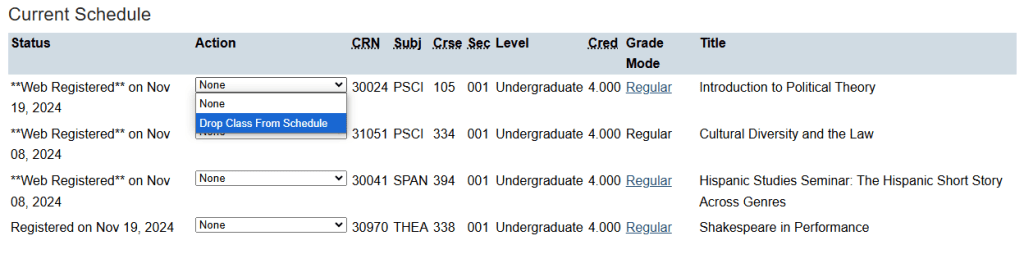
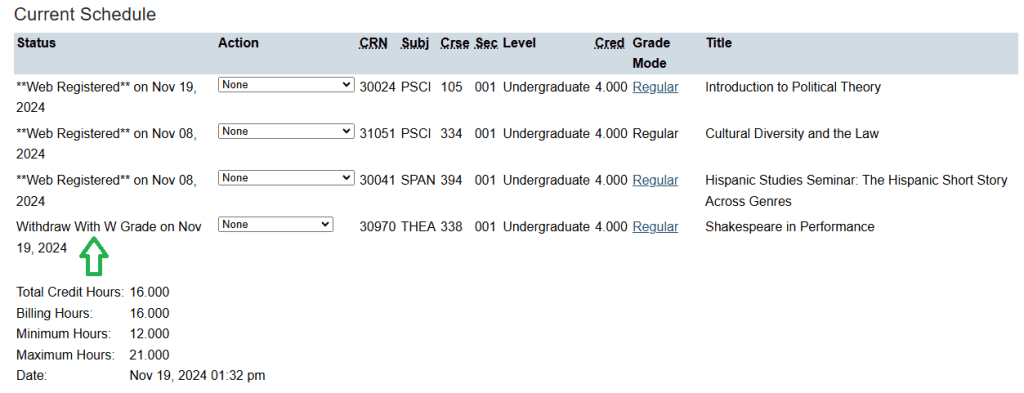
Dropping a Class With or Without a W
- Login to Treehouse and select “Register/Add or Drop Classes” from the “Registration Tools” box under the “Student” tab.
- Under the Action column next to the class you want to drop. Click the down arrow and, depending on the date in the term, select “Drop Class from Schedule” or “Withdraw with W Grade” from the drop-down.
- Scroll to the bottom of the page and click “Submit Changes.”
- Verify your class status(es) are correct before leaving the screen. If you selected “Drop Class from Schedule,” the class should no longer show on your schedule.


Students with a Registration-Blocking Hold: If you have a registration-blocking hold on your account and need to drop a class, you must submit a class drop request by clicking HERE. Requests must be submitted by the drop deadline, 11:59 PM.
Dropping a class without a W occurs during the add/drop period and removes a class completely from a student’s schedule and record. This only happens if a student drops a class before the term starts or during the add/drop period at the beginning of the term. It is only used for a student who never attended or only attended within the add/drop period at the start of a term.
Dropping a class with a W is withdrawing from a class in which the student attended after the add/drop period ended. The class remains on the student’s schedule, is counted towards the student’s time status, will receive a W grade, and is included in financial assessment. The W grade does not effect a student’s GPA, but is visible on the transcript.
Class Detail and Seat Information
WHEN SEARCHING FOR CLASSES THIS IS WHAT YOU WILL SEE:

- Red: click the checkbox to add the class to your WorkSheet. If the class if full, the checkbox will not display and you will see a “C” instead.
- Orange: the 5-digit CRN for the class. You can note this number and enter it directly in the “Add Classes Worksheet” on the “Register/Add or Drop Classes” page. Clicking the CRN link will open more information about the class section including: how the class will meet, term notes to students regarding the class, and a link to view registration restrictions and any prerequisites or corequisites.
- Green: the max amount of students allowed to register for the class.
- Blue: the number of students who have already registered for the class. If “Act” matches “Cap” the class will show as closed and the checkbox will not be under “Select.”
- Purple: the remaining number of seats in the class.
- Pink Box: look here for information about the class waitlist.
- Yellow Box: information about the total capacity and waitlist of cross listed classes. For more information about cross listed classes click here.
CLASS DETAIL PAGE VIEW
This is the view if using the Dynamic Schedule.
If accessing the schedule through the add or drop classes page in TreeHouse, click the CRN link of the class to view this information (as indicated by the orange arrow from the image above).

Registration Error Messages and What To Do
| Error Message | Description | What to Do/Who to Contact to Request Permission to Register for the Class |
| ACADEMIC STANDING PREVENTS REGISTRATION | Your academic standing (warning/probation) prevents you from registering. | Center for Academic Excellence 973-408-3327/[email protected] (CLA) or Graduate Academic Standing [email protected] (CSGS/THEO) |
| ADD PERMISSION IN 2ND WEEK | You are registering during the second week of add/drop which requires instructor approval to add yourself to the class. | Contact the instructor of the class and ask for a “Add Permission 2nd Week” override. |
| COHORT RESTRICTION | You are attempting to register for a class that is restricted to students in a particular cohort. | Contact the instructor of the class and ask for a “Cohort” override. |
| COREQUISITE (CRN #) REQUIRED | The class you have chosen requires one or more corequisites. | Four possible actions: 1. Add both by CRN: Enter both the CRN for the course and the CRN of the corequisite class into the worksheet at the same time, then click “Submit Changes.” 2. Add both by Search: Using the “Class Search” button at the bottom of the registration page, select the subject and click “Course Search”, click the “View Sections” button next to the applicable course and select the check boxes next to the two classes you would like to register for in the term. 3. Add one: If you are trying to add only one class and not the corequisite, you will need to contact the instructor of the class and ask for a “Corequisite” override. 4. Drop one: If you are trying to drop one class and not the other corequisite, you will require an override from the instructor, if approved. |
| COURSE IS NOT AVAILABLE FOR REGISTRATION AT THIS TIME | This class is closed, canceled, or otherwise unavailable for registration. | Choose a different section or a different course. |
| CRN DOES NOT EXIST | The CRN you have entered is not valid for the term. | Choose a valid CRN using the “Class Search” button at the bottom of the registration page, then select the subject and click “Course Search”, click the “View Sections” button next to the applicable course and select the check box next to the class you would like to register for in the term. |
| DUPLICATE COURSE WITH SECTION # | You are already registered for a section of this class. | Only for topics courses with two different CRNs, you may contact the instructor of the class and ask for a “Duplicate Class” override and, if approved, register to take the second section. |
| DUPLICATE CRN | You are already registered for this CRN. | Enter a new CRN. |
| DUPLICATE EQUIVALENT WITH SECTION # | You are registering for an equivalent course to one you are already registered for. A common example is cross-listed classes. | You may not be registered for two equivalent classes, such as two cross-listed classes. If you are trying to change which section you are in, drop the current registration to add the new CRN. |
| FIELD OF STUDY/MAJOR/PROGRAM/DEGREE/DEPARTMENT RESTRICTION | You are attempting to register for a class that is restricted to students in a particular program of study. | Contact the instructor of the class and ask for a “Field of Study” override if you receive an error message regarding Field of Study, Major, Degree, or Department. If you are receiving a program error, ask for a “Program” override. |
| INSTRUCTOR’S SIGNATURE/APPROVAL | This class requires the instructor to provide a signature override before a student can register. | Contact the instructor of the class and ask for a “Signature Granted (Instructor)” override. |
| LEVEL RESTRICTION | You have attempted to register for a class that your level will not allow. For example, you are an undergraduate student who has tried to register for a graduate course. |
Contact the instructor of the class and ask for a “Level” override. If you still cannot register for the class after receiving a “Level” override, submit the “Invalid Level for Course” Registration Request form. |
| MAXIMUM HOURS EXCEEDED | You have tried to register for more credits than is allowable. | Submit a Petition to Academic Standing to request an increase to your credit hour max. |
| MINIMUM HOURS RESTRICTION PREVENTS PROCESSING OF YOUR REQUEST | Minimum hours checking is turned on and you are unable to drop below the minimum hours as indicated on the Add or Drop Classes page. |
1. If you are trying to add and drop a class, you must do it in one action on the Add or Drop Classes page. Instructions here. 2. If you are only trying to drop, you must submit an Academic Standing petition to request to drop below minimum hours for the term and provide the CRN to drop. |
| MUTUALEXCLUSION WITH # | Department identified the course as having similar content to a course in which you have already received credit. | Contact the instructor of the class and ask for a “Mutual Exclusion” override or choose a different section or a different course. |
| PREREQUISITE AND TEST SCORE ERROR | The class you have chosen requires a prerequisite course or test score that you do not have on record. | Contact the instructor of the class or Program Coordinator and ask for a “Prerequisite or Test Score” override. |
| REPEAT COUNT EXCEEDS # | You have taken this course previously and the course is not repeatable for credit. |
If you are not using grade forgiveness contact the instructor of the class and ask for a “Repeat Class” override. Grade Forgiveness requests should be submitted via TreeHouse. |
| REPEAT HOURS EXCEEDS # | You have taken this course as many times as is allowed. | Contact the instructor of the class and ask for a “Repeat Class” override. |
| REQUIRES INSTRUCTOR SIGNATURE | The instructor wants to grant approval to students before they register in the class and must provide a signature override in order for you to register. | Contact the instructor of the class and ask for a “Signature Granted (Instructor)” override. |
| STUDENT ATTRIBUTE RESTRICTION | This class is restricted to students with a specific attribute that you do not have on your record. | Contact the instructor of the class and ask for a “Student Attribute” override. |
| STUDENT STATUS PROHIBITS REGISTRATION | You are not active in the registration system. |
Contact the appropriate office. New Degree Students: Contact Admissions Returning Degree Students: Re-entry Form from the Drew website Auditors/Au Pairs: [email protected] Summer Visiting Students: [email protected] |
|
THERE ARE NO MORE SEATS AVAILABLE FOR THIS SECTION (RESERVED CLOSED) or any other error message that references Reserved Seats |
This class has reserved seats. Even though there is space in the class, those seats are reserved and are not available for general registration. | You may add yourself to the waitlist, if there is one, or choose a different section. |
| THERE ARE NO REMAINING SEATS, WAITLIST IS OPEN or THIS SECTION HAS REACHED MAXIMUM CAPACITY. PLEASE SELECT ANOTHER CLASS. |
The class you have chosen to add is full. |
Three possible options: 1. Add yourself to the waitlist, if there is one. 2. Choose a different section, if available. 3. Speak with the instructor, and if approved to register for the class, have the instructor enter a “Class Cap & Waitlist” override. |
| TIME CONFLICT WITH CRN # | The course you have chosen creates a scheduling conflict with the CRN indicated in the error message. | Choose a different section or contact the instructor of the class and, if approved to register, have the instructor enter a “Time Conflict” override. |
| YOU HAVE NO REGISTRATION TIME TICKET… | Every student is assigned a time for registration, you did not receive one at the time they were assigned. | Email [email protected] with your Drew ID and the term to request a time ticket. |
| YOUR CLASS STANDING DOES NOT PERMIT YOU TO REGISTER FOR THIS COURSE. | The class is restricted to a certain class type (sophomore, junior, etc.), that you currently are not. | Contact the instructor of the class and ask for a “Class Standing: 1A/1B/SH/JR/SR” override. |
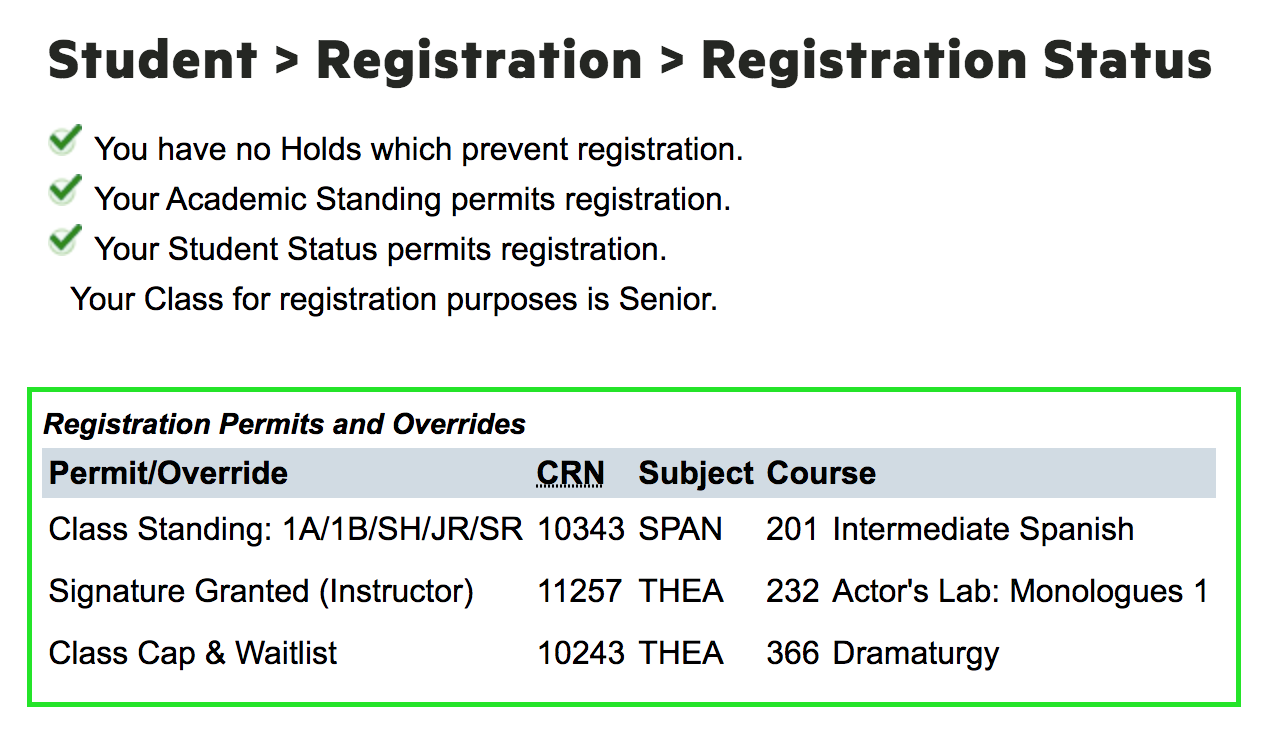
Viewing Entered Overrides
If an instructor has entered an override to allow you to register for a class, in which you received a registration error message, you are able to view if the override has been submitted by following the below instructions.
- Go to treehouse.drew.edu and click on the “Students” tab.
- Under the heading “Registration Tools”, click on the “Registration Status” link.
- Choose a term, if asked.
- If overrides are entered, view them under the “Registration Permits and Overrides” section of the page.
- If there is nothing under “Registration Permits and Overrides,” the appropriate overrides have not been entered.
- Click here to view a list of override codes and the corresponding registration error messages.
Waitlist
If a class is closed, you can check to see if there is a waitlist available in TreeHouse. A waitlist offers you the ability to add yourself to a list so that if a spot opens up in the class, you will be notified and given the ability to register yourself within 24 hours, providing you meet all the requirements of the class. Joining a waitlist does not guarantee you a spot in the class. If you take no action, you will not be in the class and will lose your spot on the waitlist.
Scroll down to view instructions on how to register once you have received a waitlist notification.
To view if a class has a waitlist in the Register/Add or Drop Classes screen:
- Click “Register/Add or Drop Classes” from the “Registration Tools” box under the “Student” tab.
- Select a Term.
- Enter your PIN.
- Select “Class Search” at the bottom of the page.
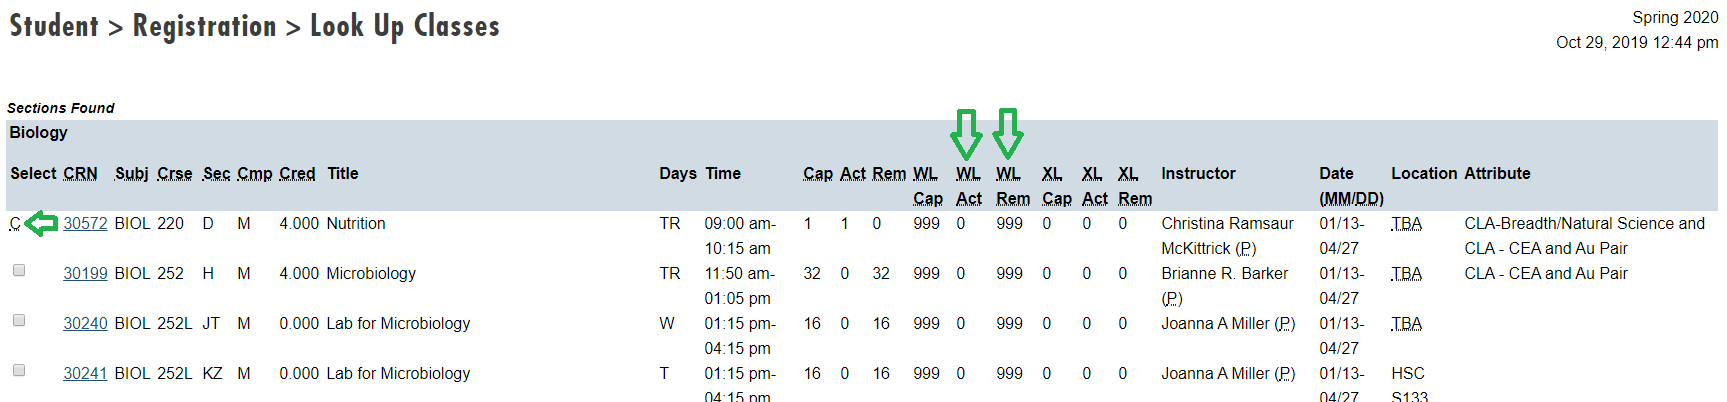
- The column “WL Rem” will indicate if there is a waitlist available.
- The column “WL Act” will show how many people are ahead of you on the waitlist.
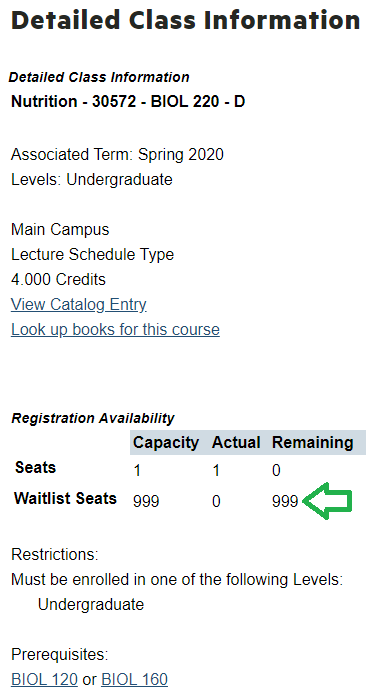
To view if a class has a waitlist in the “Dynamic Schedule” view:
The Dynamic Schedule is available from the Registrar’s Office website.
- Once you have selected a class to view if there is a waitlist.
- “Capacity” indicates the number of students allowed to join the waitlist. “Actual” indicates how many students are currently on the waitlist ahead of where you would be if you join the waitlist. “Remaining” indicates the number of spots available on the waitlist.

To add yourself to a waitlist:
- Click “Register/Add or Drop Classes” from the “Registration Tools” box under the “Student” tab.
- Select a Term.
- Enter your PIN.
- Enter the CRN of the class in the “Add Classes Worksheet.”
- Click “Submit Changes.”
- The class will initially appear under “Registration Add Errors.
- Select “Waitlist” in the action drop down menu and “Submit Changes”.
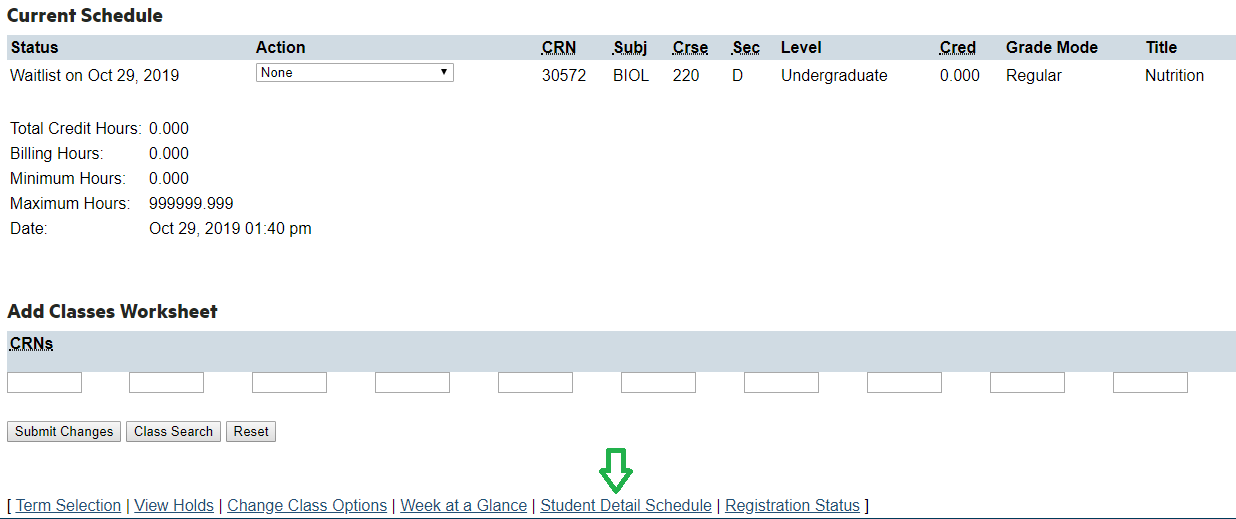
- The class will now appear in your “Current Schedule” with a status of “Waitlist.”

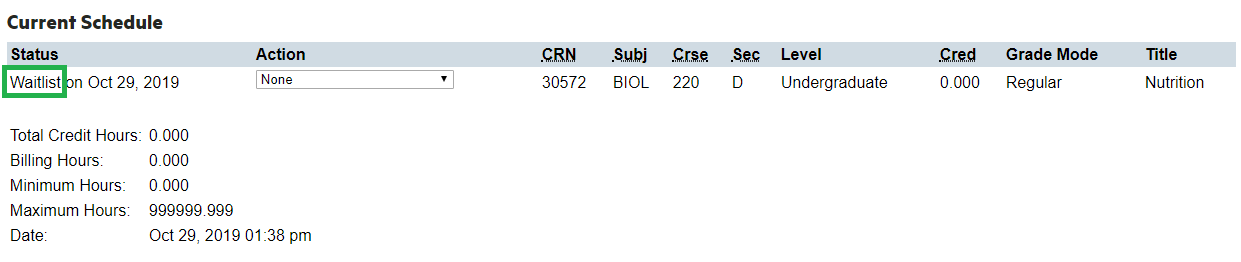
To check your position on the wait list:
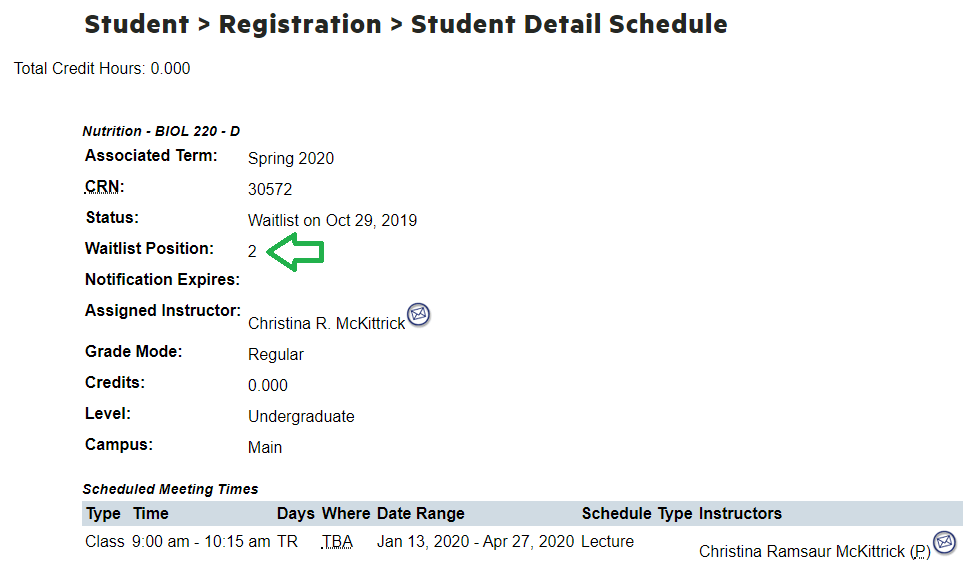
- At the bottom of the Register/Add or Drop Classes page, select the “Student Detail Schedule” link.
- Under the waitlisted course, you will see the “Waitlist Position”.
Registering Yourself Off the Waitlist:
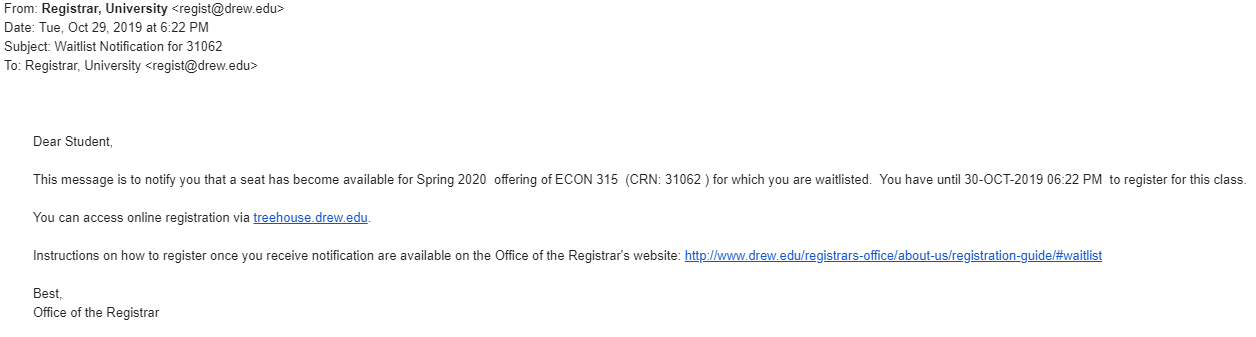
If a seat becomes available, which may happen at any point between registration week and the first week of add/drop, you will receive an email notification and have 24 hours to register for the class. If no action is taken within 24 hours, you will see that your waitlist position is 0; however, you have lost your opportunity to register for the class and will need to drop yourself from the waitlist. If you still want a chance to register for the class, you will need to add yourself back on to the waitlist.
Note: any registration restrictions or registration errors need to cleared before or within the 24 hour registration period or you will not be able to register.
Sample Notification Email:
- In TreeHouse click on the “Student” tab.
- Under “Registration tools” click on “Register/Add or Drop Classes.”
- The class will appear under your “Current Schedule” with a status of “Waitlist.”
- Click the drop down under “Action” and select “Web Registered.”
- Click “Submit Changes” to save.
- The class will now appear under your “Current Schedule” with a status of “Web Registered.”

*If you have received an override from the instructor allowing you to bypass the waitlist, you will need to drop yourself from the waitlist, then register for the class.*
Cross Listed Classes
A cross listed class is a class taught under two or more subject designations. You may only register for one of the subject designations. You may not be registered for two equivalent classes, such as two cross listed classes. If you wish to take the class under a different subject, you must drop the first class and then register for it under the correct subject code.
To see if a class is cross listed:
- You will see if a class is cross listed by the numbers under the columns starting with “XL.”
- Click on the hyperlinked CRN in the “Look Up Classes” screen.
- The CRN will bring you to “Class Schedule Listing” where you should click on the title.
- On the “Detailed Class Information” page, you can view the equivalent class in the cross list. You can also view the max number of cross list seats available and the waitlist availability.


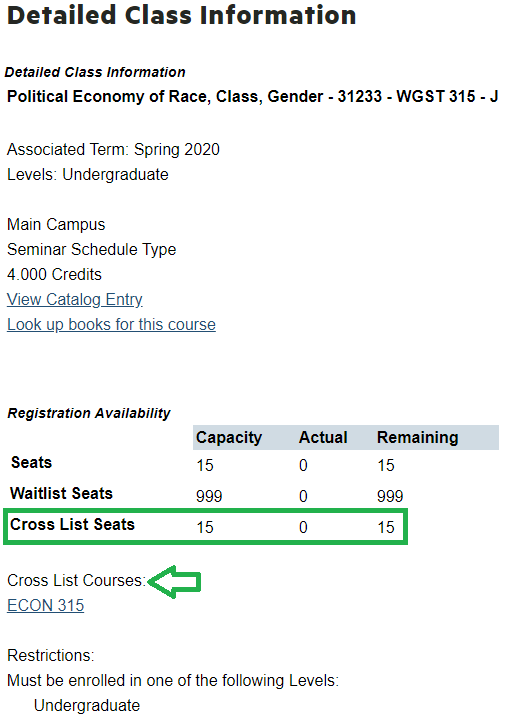
Cross List Class Details

- If the class is full, there will be a “C” under “Select” for closed.
- “WL Rem” shows the number of seats remaining on the waitlist.
- “XL Cap” displays the total number of seats available across all classes included in the cross list.
- “XL Act” displays the actual number of students registered across all classes included in the cross list.
- “XL Rem” displays the remaining number of seats available across all classes included in the cross list.
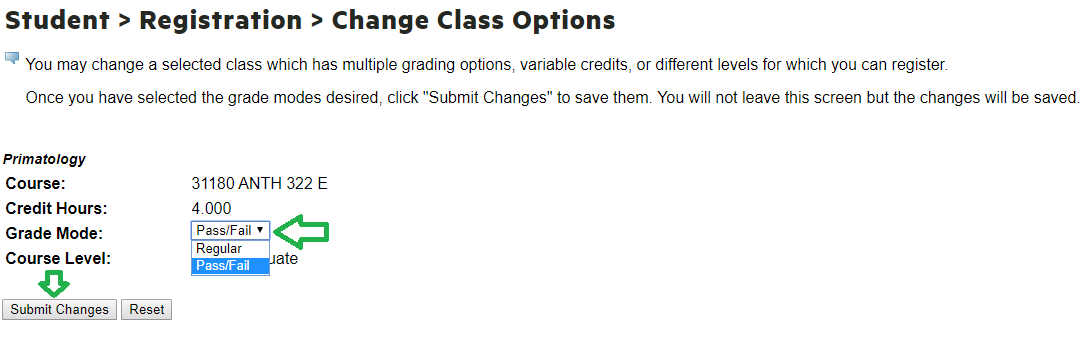
Change Grade Mode or Credit Hours
To Change Your Grade Mode or Credit Hours
- Go to TreeHouse and click on the “Student” tab.
- Under “Registration tools” click on “Register/Add or Drop Classes.”
- If you have not already registered for the class, register as normal.
- Once registered, the class will appear under your “Current Schedule.”
- To change your Grade Mode: under the “Grade Mode” column, click the hyperlink that says “Regular.” To change your Credit Hours: under the “Cred” column, click the hyperlinked number.
Grade Mode:Credit Change: - Make the appropriate change and click “Submit Changes” to save.
Grade Mode:Credit Change: - You will not leave the screen but the changes will be saved. There will be no message, but if you re-enter your registration screen, you will see the change in grade mode or credit hours.
 Credit Change:
 Credit Change:

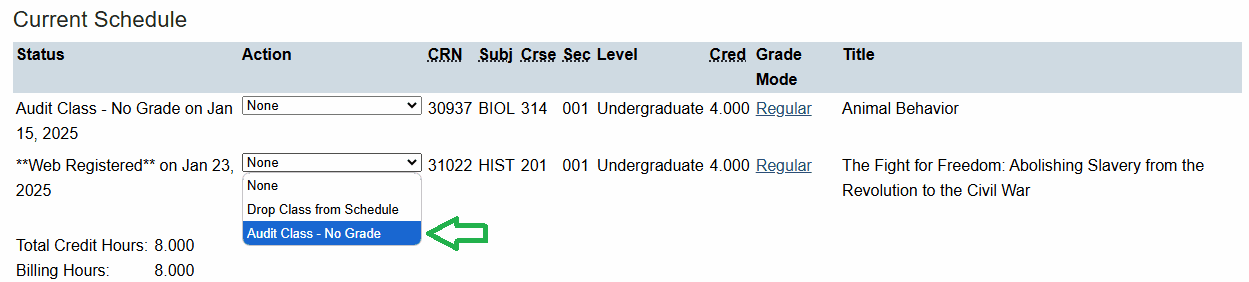
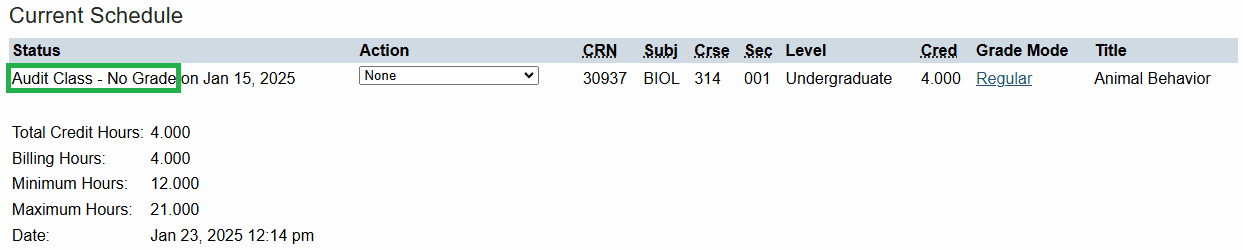
Audit a Class
Please speak with the instructor about their expectations for auditing before you register. The audit registration status is available one week prior to the start of term.
- In TreeHouse click on the “Student” tab.
- Under “Registration tools” click on “Register/Add or Drop Classes.”
- If you have not already registered for the class you wish to audit, register for the class as normal.
- Once registered, the class will appear under your “Current Schedule.”
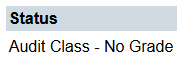
- Click the drop down under “Action” and select “Audit Class – No Grade.”
- Click “Submit Changes” to save your registration.
- Your registration screen will list your status as “Audit”
Meeting Type Definitions
The meeting type describes how the class will meet during the term.
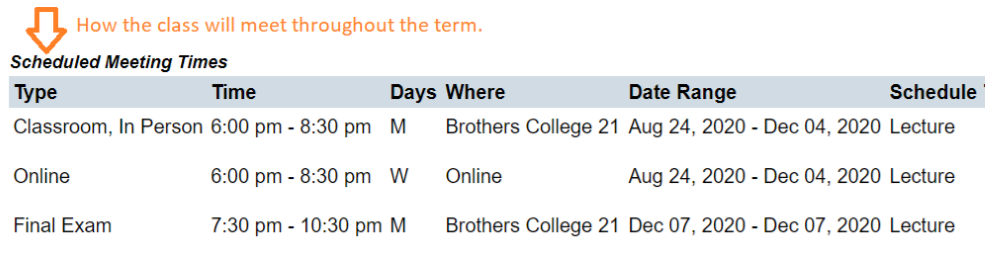
- If a student is using the “Look Up Classes” link from the “Register, Add or Drop Classes” page in TreeHouse, they will need to click the CRN to view the meeting type as in the above image.
| Meeting Type | Description |
| Classroom, In Person | Classes meet in person and at the scheduled meeting times. |
| Hybrid | The entire class meets in a mix of synchronous online and in person sessions throughout the term. |
| In Person or Online (A/SYNC) | Students attend in person or virtually, synchronously or asynchronously as determined with instructor. |
| In Person or Online (SYNC) | Students attend in person or virtually at the scheduled meeting times. |
| Independently Scheduled | Instructor and student schedule time and location to meet ad hoc. |
| Internship | May meet on or off campus. |
| Off Campus | Day travel, students would be able to return to campus (locally) by the end of the day. |
| Online | Classes meet virtually. Students attend synchronously if there are scheduled dates/times, or asynchronously if there are no meeting times. |
| Travel | Overnight travel. |
Students can search for sections by meeting type by using “Session” in the class search:
Additional Registration Information and Resources
Special Registration Forms
- Individual Instruction Registration Request (CLA): Independent Study, Immersive Research/Creative Project
- Honors Tutorial or Specialized Honors Registration Request (CLA)
- Theological School Community Fellow Application/Registration Form
- Request to drop a class with a registration-blocking hold
Retaking a Class
RETAKING A CLASS (CLA STUDENTS):
Students may request to retake courses in which a grade of C- or lower (or LP or lower) was earned. If a student previously earned a grade higher than an F or W, the student must contact the instructor for permission to retake a course; and if approved, the instructor will need to enter a “REPEAT CLASS” override to allow the student to register. Students who received a grade of F or W in the first attempt will be able to register without instructor approval. A course can only be retaken in the same grade mode as the first attempt. The retake policy may only be used for courses taken at Drew University.
In cases of special topics courses or courses offered infrequently, students must consult with the department Chair and receive approval from Academic Standing for a potential course substitution. Students may petition the Academic Standing Committee for permission to retake a course that does not meet the above requirements or a special topics course with the same topic.
Once grades are submitted, repeated classes will be reviewed and only the highest grade received in a course will be included in the calculation of the cumulative grade point average or the average in the major or minor, but all grades received in the course will appear on the transcript. The class with the lowest grade will show on the transcript with an “E” indicating this grade is exempt from GPA.
Time Grid (Schedule Blocks)
Schedule Blocks
CLICK HERE TO VIEW DREW UNIVERSITY SCHEDULE BLOCKS
W Block – Class meets on Saturday or Sunday, time is indicated in class listing.
Courses are arranged with section letters that correspond to periods of the day. This way you will not book yourself into more than one course that meets at the same time. For example, you can only take one “A” course, and so on.
In situations where the course straddles the time blocks, the section code will begin with the letter in which the course starts or will show as a combined letter combination (i.e. MO).
FORMER SCHEDULE BLOCK (2020 AND EARLIER)
| MONDAYS | TUESDAYS | WEDNESDAYS | THURSDAYS | FRIDAYS |
| A Block 7:55-9:00 |
B Block 8:05-8:55 |
A Block 7:55-9:00 |
B Block 8:00-8:55 |
A Block 7:55-9:00 |
| C Block 9:10-10:15 DSEM |
D Block 9:00-10:15 |
C Block 9:10-10:15 DSEM |
D Block 9:00-10:15 |
C Block 9:10-10:15 DSEM |
| E Block 10:25-11:40 |
F Block 10:25-11:40 |
E Block 10:25-11:40 |
F Block 10:25-11:40 |
E Block 10:25-11:40 |
| G Block 11:50-1:05 |
H Block 11:50-1:05 |
G Block 11:50-1:05 |
H Block 11:50-1:05 |
G Block 11:50-1:05 |
| J Block 1:15-2:30 |
K Block 1:15-2:30 |
J Block 1:15-2:30 |
K Block 1:15-2:30 |
J Block 1:15-2:30 |
| T Block 2:40-3:55 |
Z Block 2:40-3:55 |
T Block 2:40-3:55 |
Z Block 2:40-3:55 |
T Block 2:40-3:55 |
| L Block 4:30-5:45 (CLA); 4:30-6:00 (CSGS) |
M Block 4:30-5:45 (CLA); 4:30-6:00 (CSGS |
L Block 4:30-5:45 (CLA); 4:30-6:00 (CSGS |
M Block 4:30-5:45 (CLA); 4:30-6:00 (CSGS |
L Block 4:30-5:45 |
| P Block 7:00-9:30 |
Q Block 7:00-9:30 |
R Block 7:00-9:30 |
S Block 7:00-9:30 |
W Block – Class meets on Saturday or Sunday, time is indicated in class listing.